Inside Machines: When performing a machine vision inspection, users should assess the application, optics, lighting, setup, and runtime considerations.
Machine vision inspection is a powerful, versatile tool in automation. Despite constant technology advances, machine vision implementation tends to follow the same process with most of the same best practices and pitfalls. Follow these five steps in the process to align with best practices and avoid potential pitfalls.
1. Assess the application
Some things aren’t a good fit for machine vision. Experience is usually a good indicator, but if there are any questions about feasibility, test it first. Unforeseen challenges can cause costly hardware changes and schedule delays. Be sure to do the following during the assessment:
- Consider return on investment (ROI). Will automated inspection save on labor, fatigue, or increase throughput? What about the intangibles? Sometimes, even a single out-of-spec part missed in inspection can damage a relationship with a customer.
- Plan enough time for commissioning. The installation and programming of a camera may only take a day, but don’t forget about runtime. Proving the inspection works well over many parts is an important part of the process, and sometimes takes more time than the programming.
- List all expected conditions the system should detect and collect multiple examples of each, if possible. If a camera is being used to detect certain defects, the defects must be identified early in the process.
- Identify other conditions that may hinder machine vision performance. Is there vibration, ambient light, or anything other factors that might get in the way? Take a close look and test if necessary before committing to hardware, camera mounting, etc.
2. Select the camera and optics
Select a camera based on these features:
- Color vs. monochrome – Monochrome is lower cost and usually more accurate for measurement applications, so it’s the obvious choice if color isn’t necessary for the application.
- Resolution – Ensure the picture has enough pixels to accurately measure the features of interest. Table 1 offers some good rules of thumb to follow:
- Firmware features – Higher-level features like calibration, optical character recognition (OCR), and pattern matching frequently come on higher end cameras or cameras with those firmware options enabled. Check with the vendor to make sure the camera has the necessary features.
- Inspection speed – This is a question of how long it takes to get the picture into the inspection (acquisition) and how long it takes to inspect. Get a camera with enough processing power for the application.
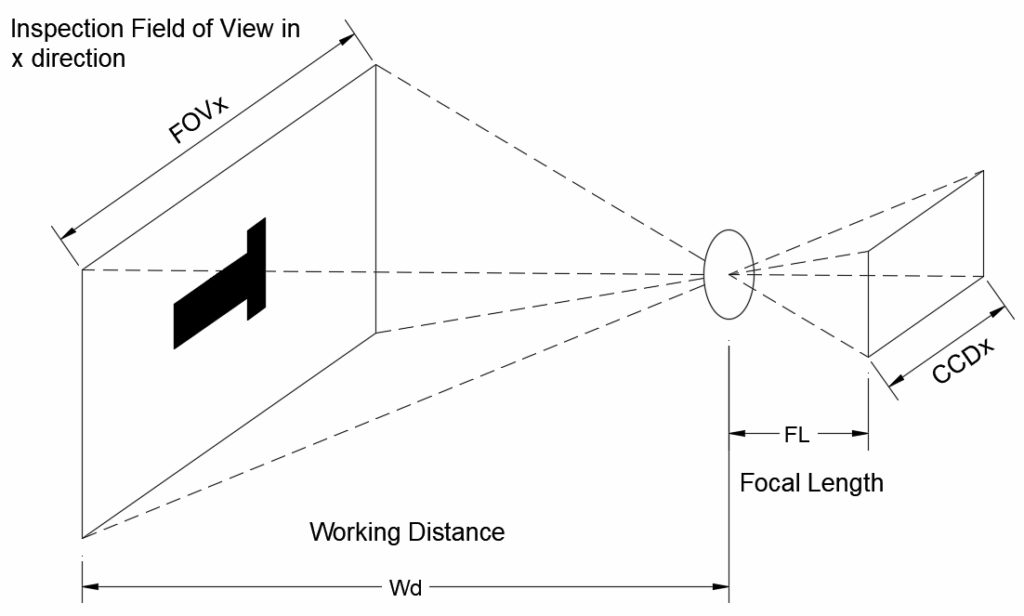
Lens focal length – Most cameras require an external lens. This requires knowing where the camera will be mounted and the size of the sensor in the camera. Camera manufacturers usually have an online calculator to assist with this, but also consider this formula as a guide:
- FL = (CCDx * Wd) / FOVx
- FL = Focal length of lens (mm)
- CCDx = Size of CCD sensor, x direction (mm)
- Wd = Working distance to lens (mm)
- FOVx = Field of view, x direction (mm).
Table 1: Recommended machine vision pixels for an application
| Recommended number of pixels | |
| Linear measurement | Measurement tolerance = 10 pixels |
| Area measurement | 5 x 5 mm |
| Text recognition (OCR) | 25 – 35 mm (character height) |
3. Consider lighting
The purpose of lighting is to make key features highly visible, while reducing the visibility of features that might confuse the inspection tools. Finding the right solution can require experimentation, creativity, and experience.
This is the part of the inspection most likely to change during install, so do the due diligence for the implementation and test this beforehand to ensure things go smoothly. Common examples of machine vision lighting considerations follow:
- Backlighting – This is most often used when the outside geometry of a part is important, and surface features are not. It makes surface defects invisible while giving high contrast to the outside edges.
- Front lighting – This can be used when the feature of interest is a color change (for example, checking presence of a label, or verifying printing). If a part is shiny, however, it creates glare, which would interfere with the inspection. In a case where a part has several angled faces, the reflective quality can allow the inspection system to measure just the faces perpendicular to the lighting.
- Side lighting – If the surface features are most important, lighting from the side(s) may be most effective to highlight those features. n Bright lights – High-speed acquisition requires bright lights. This is usually important for moving parts to reduce motion blur.
- Colored lights – Colored lights can be used to mask or highlight key features. For example, if a white part is inspected with red and blue printing, using a red light would hide the red printing and make it easier to inspect the blue printing. If a system needs to ignore color differences between different parts, infrared radiation (IR) lighting may be a good choice.
- Multiple lighting angles – Some camera systems support taking a series of images with different lights, then processing those images to find the differences. This highlights surface features.
- Polarized lighting – Using a polarized filter on the light and the camera can reduce glare, just like polarized sunglasses.
- Ambient lighting – It’s not usually recommended to use ambient lighting for a vision inspection application because it’s not in control of the automation. Lamps may be changed to be different brightness or color, shadows may be present when people walk by, the sun may shine through a window at one time of the day, etc. Ambient lighting, however, can adversely affect a vision application even if dedicated lighting is used. This can be mitigated by using dedicated lighting that’s much brighter than ambient lighting and by blocking ambient lighting.
4. Set things up
Once all the parts are assembled, it’s time to make things work. These steps are crucial for ensuring quality:
- Get aperture and exposure in the ballpark so focusing is possible.
- Set focus. Camera software usually has a mode that gives a number for the quality of the focus while you adjust for the shot. This makes it easy to find the right spot.
- Revisit aperture and exposure. It’s important to get the best contrast possible on the features of interest. Try turning the aperture in the direction that gives the brightest image, which allows a faster exposure and is better for moving parts. If the part has some depth to it, tightening the aperture—turning in the direction that makes the image dimmer—will increase the depth of focus. Set the exposure to a place where contrast is high at the features of interest.
- Setup location and inspection tools. There’s no one right answer, but the rule of thumb is to use the simplest inspection tools that do the job well. They’re faster to process and setup, and can be less sensitive to minor changes. For example, if a camera is used to check presence or absence of a label on a box, a tool could be used to check the brightness in the area. Brightness tools are very simple, process quickly, and aren’t very sensitive to minor changes on the printing of that label. In contrast, if a pattern tool is used to detect that label, it’s likely to take longer to process and may be more sensitive to changes in label printing.
5. Consider runtime
Initial programming is usually done on a small sample of parts, but they don’t represent the entire population. Train the system on a small sample, then validate and tweak using a larger sample when the automation is running. Here’s help for machine vision programming:
- Test on every part type including every color and variation.
- Test with every expected variation of defects. For example, if an expected defect is mold flash on a part, have examples for big flash, small flash, and flash on different areas of the part. Get some that are barely out of spec and make sure the system catches the defect. Get some that are barely in spec and ensure they pass.
- Watch for false positives and false negatives. Does a part get counted as “bad” when it’s not? Does a part get counted as “good” when it’s not? Sometimes it’s more preferable to have some good parts thrown out than to have any bad parts get through.
- Recording images to a laptop for a few hundred parts can help figure out what’s gone right or wrong, and can be used for offline program changes if tweaks need to be made.
There’s no replacement for experience when it comes to implementing a machine vision inspection system, but the powerful inspection tools available make many applications accessible to less experienced people. Do the work up front and validate thoroughly, which will result in a system to be proud of.

About the Author
Jon is an engineer, entrepreneur, and teacher. His passion is creating and improving the systems that enhance human life, from automating repetitive tasks to empowering people in their careers. In his spare time, Jon enjoys engineering biological systems in his yard (gardening).


